Recommended procedure for sandbag dike construction.
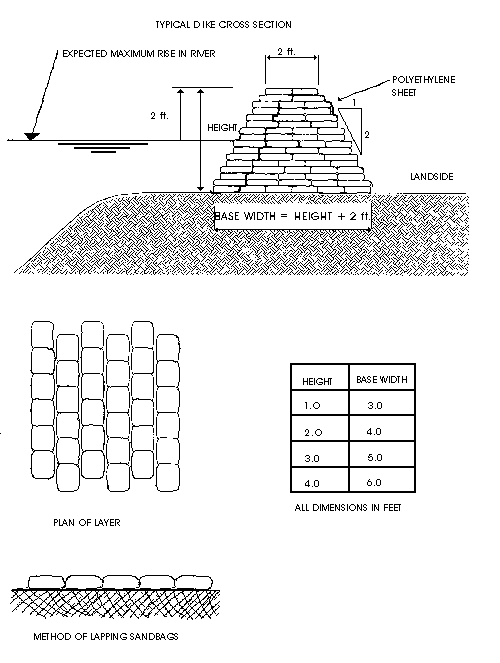
Dike Construction Diagram
1. Base area of sand bag dike should be clear of snow or ice prior to commencing.
2.Leave at least 8 feet between a dike and buildings.
3.The base of the dike should be 2 feet wider than the ultimate height of the dike, E.G. Height = 4 ft., base = 6 ft.. Every second layer of sand bags should be set back 1/4 of a sand bag width, both on the river side and the land side of the dike, giving it a step-like appearance. The top of the dike should be 2 feet wide.
4.The bottom layer of bags on the river side will run parallel with the river.
5.Sand bags are to be tamped firmly into place.
6.It is recommended that 6 mil polyethylene sheets in 10 foot wide rolls be used as water proofing on the river side of the dike. The polyethylene sheet should be placed loosely against the sand bag dike during construction with a protective layer of sand bags placed on the river side as indicated in the figure.
7.Have extra sand bags on hand to strengthen any weak spots in the dike.
8.If untied bags are used, the top, or unfilled portion of the sack should be stretched lengthwise and the next bag laid on top of it. This method is known as lapping as indicated in the figure. It is not necessary to tie sacks. Untied bags should be filled to half full.
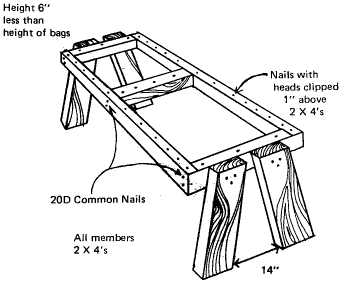
9.You can build a simple sandbag filling rack to expedite filling the sandbags.
Calculator to compute the number of sandbags needed for a dike